One Day MVP Sales Pages

For an entrepreneur, the first sale an acknowledgement from the world. Your first sale is solid ground underneath your feet to build upon. You should want to get there as quickly as possible.
In this concise guide, I'm going to walk you through launching a sales page by the end of the day. For those of you passionately coding an MVP, embracing simplicity in technology can often accelerate your path to market. Deploying something simple can get things moving and start your creativity flowing. Basic computer skills will suffice - this is designed for any builder eager to make an impact.
We'll dive into deploying a straightforward server setup that not only facilitates payment processing but also empowers your customers to choose their price point. Below, you'll find an overview of how these components seamlessly integrate.
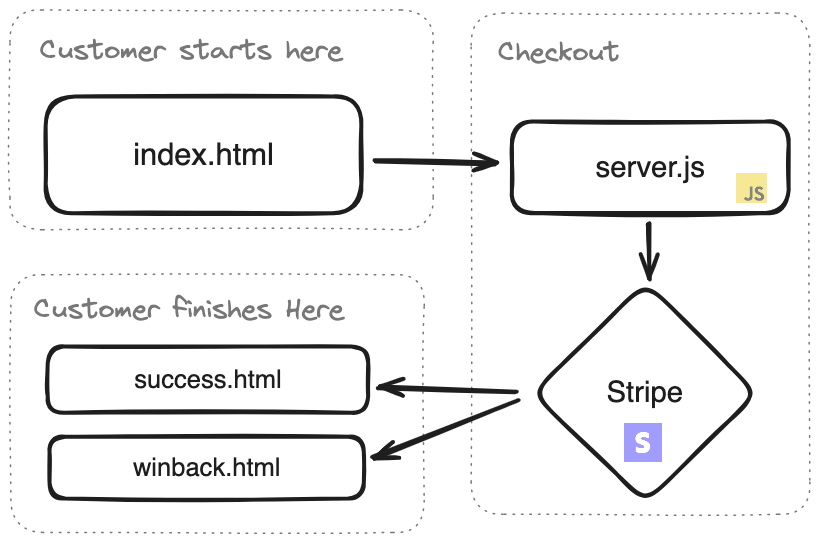
Look simple? It is. Four files is all we need. This only uses javascript and html - the most basic internet technologies around. You can do this.
The Morning Coffee - Setup, Gather Resources and Create Project
The first steps are to get a basic web server running and sign up for both stripe and fly accounts.
Stripe - Sign up for an account. They will handle your purchases for you and have lots of payments options for users. Log in, click on "Developers", then "API Keys" and copy down both the pk_... and sk_... keys - these are your production and testing secrets.
Node - You need to install this. If you don't have it already, it's a big download. Make sure you can open a terminal and run this:
node --versionFly - Sign up for an account, install the flyctl, open a terminal or command prompt and execute the following command:
fly auth loginBuild your Web Server
Create an empty folder for your project. Run npm init inside that folder to start a node project. This will set up some basic files for you like a package.json that defines our dependencies and instructions for running the project. We will need three libraries to make our POC work so let's install them now. Run this in the root project folder:
npm install stripe body-parser expressNow create one file called server.js that contains the following:
const express = require('express');
const app = express();
app.use(express.static('public'));

const YOUR_DOMAIN = 'http://localhost:3000/'

app.listen(4242, () => console.log(`Running on ${YOUR_DOMAIN}`));
This code will run an express web server. It will serve the contents of the public folder. Create a file called index.html and put it in a folder called public. Write something identifiable in that file like H3LL0 W0RLd and then open a terminal in the folder and type:
node server.jsCongratulations. You are running a web server locally. Navigate to http://localhost:3000 in a browser and check out your handy work.
index.html and restarting the server. You can stop the running process by holding CTRL and pressing C inside the terminal where your server is running.Early Afternoon Flow - Local Dev Setup and Full Implementation
We will start with creating our sales page and price selector. Paste the following content into index.html. This is entirely self contained html and javascript code. You could open that file in a browser and it would work as is.
<html>
  <head>
    <script src="https://cdn.tailwindcss.com"></script>
    <script>

      document.addEventListener("DOMContentLoaded", function(){
        document.getElementById("pwycform").addEventListener("input", function () {
          const priceCents = document.getElementById('price').value;
          document.querySelector('#payButton').innerText = `Pay $${(price.value / 100).toFixed(2)}`
        });
      });
    </script>
  </head>
  <body>

  <div class="flex items-center justify-center min-h-screen px-24">
      <form class="grid gap-2" id="pwycform" action="/create-checkout-session" method="post">
      <div class="space-y-2">
        <h1 id="youPay" class="text-3xl font-bold tracking-tighter sm:text-4xl">Select an amount.</h1>
      </div>
      <input
      type="range"
      id="price" name="price"
      value="50" step="50" min="50" max="5000"
    >
          <button
            id="payButton"
            class="bg-red-500 hover:bg-lime-400 text-white font-bold py-2 px-4 border-b-4"
          >
            Use the slider above.
          </button>
      </form>
  </div>

  </body>
</html>
Restart the server and you should see the following:
Resist the urge to do too much at the moment. There's some basic javascript to make the button text dynamic, and the above has tailwind css installed, so you can tweak to your hearts content once it's live.
This is an html form so when you click the button, your browser will attempt to make a post request to the endpoint create-checkout-session because of this line:
<form action="/create-checkout-session" method="post">
Let's create that post endpoint now. We will use the simple Stripe Checkout flow that forwards our user to a page which accepts the payment, and then returns them back to our site after they either complete or cancel that payment.
Open up server.js and put this somewhere near the top. Replace sk_... with the Stripe Test API key that we obtained when we signed up for an account.
const stripe = require('stripe')('sk_...');
app.use(bodyParser.urlencoded({ extended: true }))
The first line instantiates the stripe object that we will use for creating a session. The second line allows us to extract the price from our front end request
In server.js add the following just before the app.listen line.
app.post('/create-checkout-session', async (req, res) => {
  const price = req.body.price;

  const session = await stripe.checkout.sessions.create({
    line_items: [
      {
        price_data: {
          unit_amount: price,
          currency: 'cad',
          product_data: {
            name: `You will pay ${(price / 100).toFixed(2)}`
          },
        },
        quantity: 1,
      },
    ],
    mode: 'payment',
    success_url: `${YOUR_DOMAIN}/success.html`,
    cancel_url: `${YOUR_DOMAIN}/winback.html`,
  });

  res.redirect(303, session.url);
});
We can also pass an image url to customize the appearance of the checkout page, but this will be enough to get us live.
This code uses the stripe sdk to redirect the user to a payment page that is linked with our stripe account (since we used that private key). If they pay successfully, they will get forwarded back to success.html and if they don't complete the payment for any reason they will head to winback.html.
We now need to create success.html and winback.html - create those files in our public folder so that once a payment either happens or is cancelled, Stripe can forward us back to our website. Create success.html with the following:
<html>
  <head>
    <script src="https://cdn.tailwindcss.com"></script>
  </head>
  <body>
    <div class="flex items-center justify-center min-h-screen">
      <div class="space-y-2">
        <h1 class="text-3xl font-bold tracking-tighter sm:text-4xl">
          Your payment was successful. Thanks!
        </h1>
      </div>
    </div>
  </body>
</html>
And winback.html with the following:
<html>
  <head>
    <script src="https://cdn.tailwindcss.com"></script>
  </head>
  <body>
    <div class="flex items-center justify-center min-h-screen">
      <div class="space-y-2">
        <div class="space-y-2">
          <h1 class="text-3xl font-bold tracking-tighter sm:text-4xl">That didn't quite work</h1>
        </div>
        <br />
        <a href="/">
          <button class="bg-red-500 hover:bg-lime-400 text-white font-bold py-2 px-4 border-b-4">
            Try Again
          </button>
        </a>
      </div>
    </div>
  </body>
</html>
These are pretty basic, but we can iterate on the designs once the functionality is in place. The winback page is a great place to add some compelling copy to get people to complete a sale. For now it just has a button that leads users back to where they started.
4242 4242 4242 4242 should always work.We will want to alter the code above to use environment variables instead of hard-coded values so that we can deploy the same code to production. We'll want to make some small changes to the package.json file, and replace any instances of the url or stripe keys with values from process.env - a version with all of those changes that you can use or fork from is available here:
 rogersnick
After Hours Deploy - Launch at Fly or Your Own Domain
We now have a basic app set up and running, and the final step is to deploy it to the web. Be not afraid. We have carefully defined environment variables along the way to protect our valuable secrets. Deploying to fly.io is a single (command that will walk you through some steps). Execute this in your project directory.
flyctl launchThis should create some new resources like fly.toml and a Dockerfile - these define how your app gets packaged and launched. Once your app is created, head to the fly.io dashboard, find your app, and click on SECRETS to set up the environment variables we need. In particular you should set up
STRIPE_API_KEY -- use the real production key in fly
YOUR_DOMAIN -- coolapp.fly.dev
Of course, replace coolapp with the name you have chosen for your fly app. You should now be live with a payments page at coolapp.fly.dev.
Set up Custom Domain
If you have a custom domain (or get one) and want to use that, you'll need to add some certificates and inform fly how to handle the traffic. Execute the following in the same project directory:
fly certs add www.mywebsite.comThen you'll need the IP address of your fly deployment. Execute the following:
fly ips listLast step – create an "A" Record with your domain registrar and assign the address you see here as the value. It may take a few minutes to propagate but you are now live!
Deploying to a Subdomain
If you want to deploy your sales page to a subdomain (eg - sales.mywebsite.com) then you can do it with a few custom DNS entries and a little fly.io cert magic. There isn't as much guidance on it online, but it only took two steps. First, create some certs that tell fly which app is linked to the url:
flyctl certs create subdomain.mywebsite.com Second, add a CNAME record with value HOST = "subdomain" and VALUE = "coolapp.fly.dev". This process will be different depending on where you registered your domain.
Next Steps
You're live! When sales roll through you get notified and stripe collects email addresses for you. You can manually reach out to customers if you like, or even consider adding some automations using a tool like Zapier which can automatically do all kinds of things for you whenever a sale is made. Perhaps you could gate some content on the success page that customers would pay to access. Test, learn, and evolve, always with the customer's voice as your guiding star.